Difference between revisions of "Reports Based on Multiple Tables - Overview"
(→Inner and Outer Joins) |
|||
| (14 intermediate revisions by 2 users not shown) | |||
| Line 1: | Line 1: | ||
| − | {{ | + | {{Banner-UnderConstruction}} |
| − | + | =Overview= | |
| + | This article will run you through the process of creating one of the most useful [[Reports|reporting]] features available in a [[SmartSimple]] [[instance]]: the ability to relate information from two recordsets (tables) into a single report. | ||
| − | In this | + | In this specific exercise, you will create a query that uses the company table and the contact table. |
| − | + | =Connecting Multiple Recordsets for a Report= | |
| + | 1. Click the 9-square menu icon on the top right of your page. | ||
| − | + | :: {{Icon-Menu}} | |
| + | 2. Under the tab '''Tools, '''select '''Reports. ''' | ||
| − | + | The list of available reports in your system will be displayed. | |
| − | |||
| − | |||
| − | + | 3. Click the '''+ icon '''on the top left, above the [[List View Overview|list]] of reports, to create a '''New Report.''' | |
| − | + | 4. The '''New Report '''page is displayed, with fields for you to fill out. | |
| − | + | :: [[File:Reports multiple tables new.png|800px|border]] | |
| + | For this example exercise, fill out the following fields with the corresponding information: | ||
| − | [[ | + | * '''Report Name: '''List Companies and Contact |
| − | + | * '''Report Description: '''This report joins the company and contacts table. | |
| − | + | ||
| + | 5. Click the '''Save '''button. | ||
| + | |||
| + | You will now select the two tables that are required in the report. | ||
| + | |||
| + | 6. Click on the new tab called '''[[Report Recordsets|Recordsets]] '''in the top row of tabs. | ||
| + | |||
| + | :: [[File:Recordsets tab.png|750px|border]] | ||
| + | 7. Set the primary table to '''Primary Table '''to '''Organizations '''and the '''Inner Join '''as '''Contacts.''' | ||
| + | |||
| + | To do so, simply set both the '''Organizations '''field (found under the '''Company and Account '''heading) and the '''Contacts '''field (under '''Users and Contact) '''to '''Inner Join: ''' | ||
| + | |||
| + | :: [[File:Company and contact inner join.png|250px|border]] | ||
| + | : | ||
| + | :* The '''Organizations '''recordset will report on company information that you have entered into the system, including all organization-specific [[Custom Fields]] that are related to organizations. | ||
| + | :* The '''Contacts '''recordset will report on all contacts ''outside ''of your organization (although this does not automatically mean that they are [[External|external]] [[User|users]]). This table will include all contact-specific and [[User Role|role]]-based [[Custom Fields]]. | ||
| + | 8. Scroll down to the bottom of the page and click '''Save.''' | ||
=Inner and Outer Joins= | =Inner and Outer Joins= | ||
There are two types of joins supported in [[SmartSimple]] – inner joins and outer joins. | There are two types of joins supported in [[SmartSimple]] – inner joins and outer joins. | ||
| − | + | {| class="wikitable" | |
| − | + | |- | |
| − | + | !|Inner Join | |
| + | || | ||
| + | The''' inner join''' displays the intersection between the two selected tables. | ||
| − | + | This is the most common type of join used, and is the default when you [[Adding a Table to a Report|add tables to a report]]. | |
| − | + | When you join the organization and contact table with an inner join, the report will find the matching record(s) from the contact table related to each organization. If no match is found, the record from the company will not be included in the report results. If multiple results are found in the contact table, the company information will be repeated. | |
| − | + | |- | |
| + | !|Outer Join | ||
| + | || | ||
| + | The '''outer join''' is very different from an inner join. Instead of limiting results to those from both tables, it limits results to those in the "left" organization table. | ||
| − | + | This means that if there are no records in the organization table, a row in the report will still be returned for that company, but with NULL values for each column from contact. | |
| − | + | Only use the outer join if you would still like all results (regardless of matching records with the other table) to show up. | |
| − | 1. Open the '''Report | + | |} |
| + | 1. Open the '''Report Builder '''by clicking on the four-square icon above the name of the report. | ||
| − | 2. | + | :: [[File:Report builder icon.png|border]] |
| + | 2. The report builder is opened in a modal window. Click into each field and select the following information: | ||
| − | :[[Image:Reps98.png]] | + | :: [[File:Recordsets multiple table example.png|700px|border]] |
| − | + | :: [[Image:Reps98.png]] | |
| − | + | See [[Reports#Classic Report Builder - Column Settings|Classic Report Builder - Column Settings]] for more information about the report builder columns. | |
3. '''Build''', '''save''', and '''preview''' the report. | 3. '''Build''', '''save''', and '''preview''' the report. | ||
| − | :[[Image:Reps97.png]] | + | :: [[Image:Reps97.png]] |
| − | + | ::* The company name, city, and state information is displayed from the company table for each matching record from the contact table. | |
| − | :*The company name, city, and state information is displayed from the company table for each matching record from the contact table. | + | ::* No company details will be displayed if there are no contacts. |
| − | |||
| − | :*No company details will be displayed if there are no contacts. | ||
| − | {{PrevNextStart}} [[Creating a Public – Internet Enabled Report]] | + | {{PrevNextStart}} [[Creating a Public – Internet Enabled Report]] |
| − | {{PrevNextMid}} [[Using an Outer Join]] {{PrevNextEnd}} | + | {{PrevNextMid}} [[Using an Outer Join]] {{PrevNextEnd}} |
[[Category:Reports]] | [[Category:Reports]] | ||
Latest revision as of 13:57, 8 July 2019
Overview
This article will run you through the process of creating one of the most useful reporting features available in a SmartSimple instance: the ability to relate information from two recordsets (tables) into a single report.
In this specific exercise, you will create a query that uses the company table and the contact table.
Connecting Multiple Recordsets for a Report
1. Click the 9-square menu icon on the top right of your page.
2. Under the tab Tools, select Reports.
The list of available reports in your system will be displayed.
3. Click the + icon on the top left, above the list of reports, to create a New Report.
4. The New Report page is displayed, with fields for you to fill out.
For this example exercise, fill out the following fields with the corresponding information:
- Report Name: List Companies and Contact
- Report Description: This report joins the company and contacts table.
5. Click the Save button.
You will now select the two tables that are required in the report.
6. Click on the new tab called Recordsets in the top row of tabs.
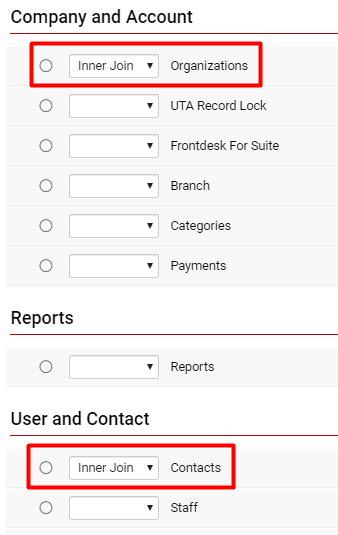
7. Set the primary table to Primary Table to Organizations and the Inner Join as Contacts.
To do so, simply set both the Organizations field (found under the Company and Account heading) and the Contacts field (under Users and Contact) to Inner Join:
-
- The Organizations recordset will report on company information that you have entered into the system, including all organization-specific Custom Fields that are related to organizations.
- The Contacts recordset will report on all contacts outside of your organization (although this does not automatically mean that they are external users). This table will include all contact-specific and role-based Custom Fields.
8. Scroll down to the bottom of the page and click Save.
Inner and Outer Joins
There are two types of joins supported in SmartSimple – inner joins and outer joins.
| Inner Join |
The inner join displays the intersection between the two selected tables. This is the most common type of join used, and is the default when you add tables to a report. When you join the organization and contact table with an inner join, the report will find the matching record(s) from the contact table related to each organization. If no match is found, the record from the company will not be included in the report results. If multiple results are found in the contact table, the company information will be repeated. |
|---|---|
| Outer Join |
The outer join is very different from an inner join. Instead of limiting results to those from both tables, it limits results to those in the "left" organization table. This means that if there are no records in the organization table, a row in the report will still be returned for that company, but with NULL values for each column from contact. Only use the outer join if you would still like all results (regardless of matching records with the other table) to show up. |
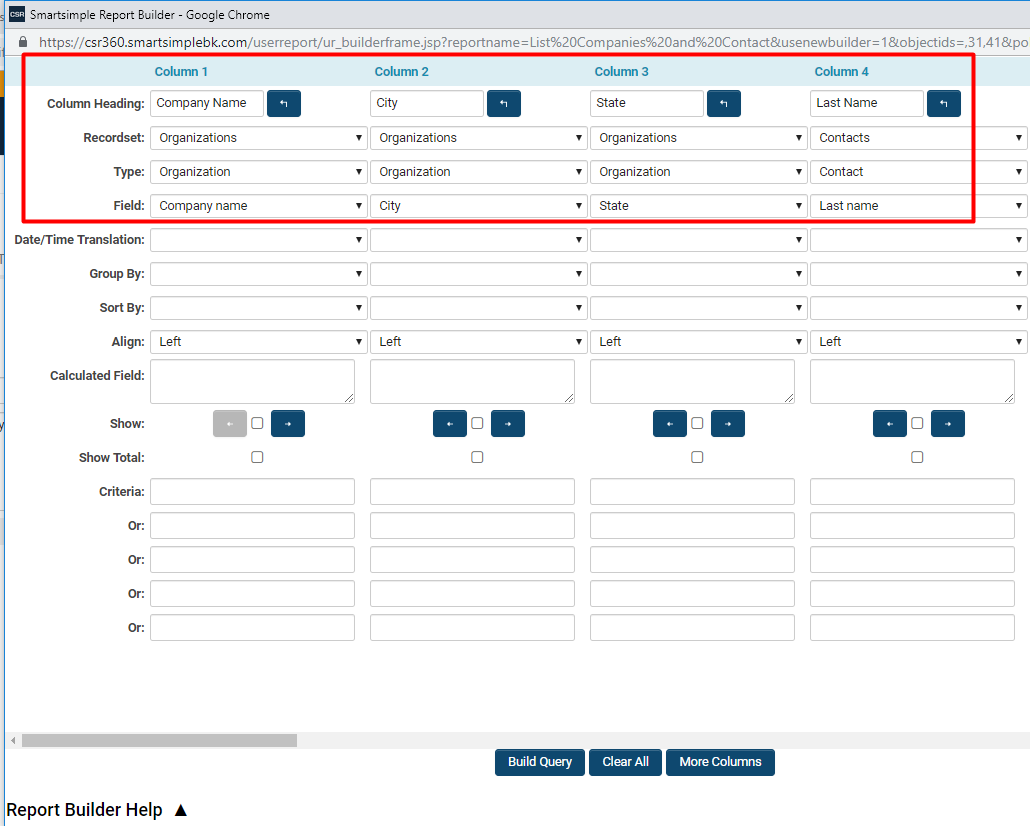
1. Open the Report Builder by clicking on the four-square icon above the name of the report.
2. The report builder is opened in a modal window. Click into each field and select the following information:
See Classic Report Builder - Column Settings for more information about the report builder columns.
3. Build, save, and preview the report.


