Difference between revisions of "Batch Update"
| Line 24: | Line 24: | ||
==Using Batch Update== | ==Using Batch Update== | ||
| + | ===Choose Level=== | ||
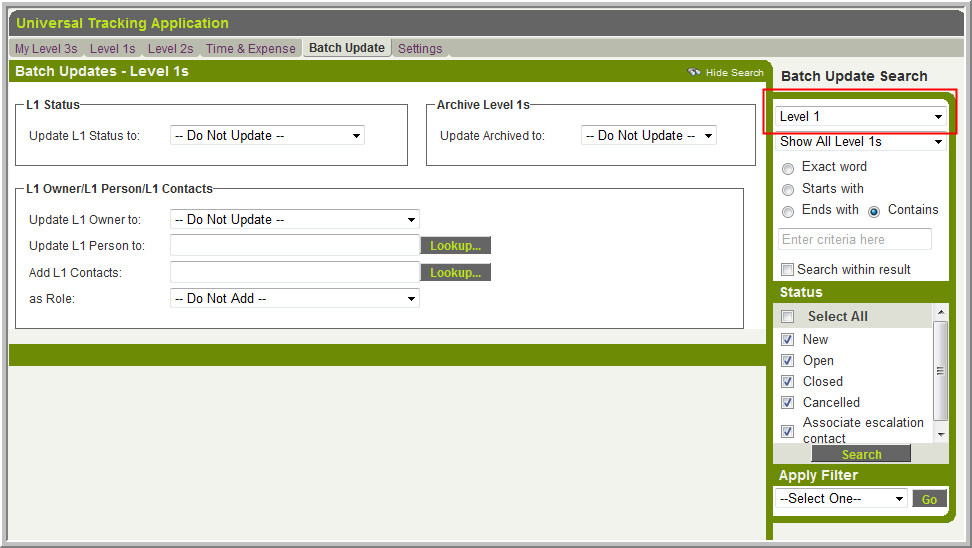
| + | First you must select which group of records you wish to update: Level 1, 2, 3 or Time & Materials, using the uppermost combo box on the search panel: | ||
[[Image:BatchUpdate.png]] | [[Image:BatchUpdate.png]] | ||
| − | + | ===Search=== | |
| − | + | You should use the search panel on the right to find the subset of records you wish to update. | |
| − | * | + | * You can use the '''Search within result''' check box to further refine your search. |
| − | :[[Image: | + | * If there are more records than fit on one page (depending on your personal settings) you may want to click '''Show All''' so they can all be displayed: |
| + | :[[Image:BupShowAll.png]] | ||
| + | |||
| − | |||
| − | |||
<u>Select</u><br> | <u>Select</u><br> | ||
Revision as of 13:40, 14 May 2010
The Batch Update feature in the Universal Tracking Application allows multiple records to be updated all at once.
The fields that can be updated are:
- Level 1: Status, Owner and Person
- Contacts can assigned to records with a given Role
- UTA Consumer/Provider
- Level 1 records can be archived
There is also a Batch Update the for the settings section of Custom Fields,
found on the Field List page when editing Custom Fields.
Click here to go to the associated Wiki article.
Note: Batch update is a very powerful tool. Review the implications below before enabling.
Enabling Batch Update
This feature is accessed via the Batch Update tab on the menu bar:
Visibility of the Batch Update tab is controlled on a per-role basis for each UTA using the Show Batch Update Manager Permission.
- Important: See below for the security implications of allowing Batch Update to be used.
Using Batch Update
Choose Level
First you must select which group of records you wish to update: Level 1, 2, 3 or Time & Materials, using the uppermost combo box on the search panel:

Search
You should use the search panel on the right to find the subset of records you wish to update.
- You can use the Search within result check box to further refine your search.
- If there are more records than fit on one page (depending on your personal settings) you may want to click Show All so they can all be displayed:
Select
Next you need to select the check box to the left of all records you wish to update.
- If you want to select all records click the check box at the very top of the list which will Select All.
- You can then de-select some records if required.
Update
Once you have selected the records you wish to update you should enter the new Status and/or Owner for those records in the Update Values section. Then click the Batch Update button.
A pop-up box will notify you when the Batch Update is complete.
- If you updated the Status, any Workflows associated with the new Status will be triggered during the batch update.
Note: the changes will not be shown on screen.
Important
Batch Update is a powerful tool. If the Batch Update tab is displayed, anyone with access to it will be able to change the Owner and Status on any Level 1 record.
- It ignores the Lock on Status, Roles That Override Lock and Roles That Can Set This Status settings on the Status pages.
- Records can be changed to a Status that is not associated with the given Template.
- Any Visibility Conditions or Browser Scripts that control the Owner or Status fields will be ignored.

